
Neither coating wins outright: polyaspartic is the better call when you need speed, UV stability and low downtime, while epoxy still earns its place on tricky slabs, high-build broadcast jobs and tighter budgets. Most flooring professionals end up recommending a hybrid, an epoxy base with a polyaspartic topcoat, because it borrows the strengths of both and avoids the weak points of either.
TL;DR:
- Polyaspartic coatings cure much faster, allowing foot traffic in as little as 1 to 6 hours, whereas epoxy can take over a day to reach full cure.
- Polyaspartics resist yellowing from sunlight better than epoxies, making them ideal for floors exposed to natural light or external conditions.
- The hardness and chemical resistance of both systems depend heavily on formulation quality, with no inherent superiority, so product selection matters more than chemistry.
- Epoxy costs less per liter and tolerates thicker layers, while polyaspartic’s higher upfront cost is often offset by faster installation and reduced downtime.
- Proper surface preparation and moisture testing are crucial for both coatings to prevent adhesion failure, with epoxy more forgiving on damp slabs.
Table of Contents
- Polyaspartic vs epoxy floor coating: the measurable differences
- How epoxy and polyaspartic are actually applied
- What does it cost, and how long does it last?
- Maintenance, recoating and everyday cleaning
- When to choose polyaspartic, epoxy, or both
- What Sweepandscrub sees before a coating goes down
- Sources
Polyaspartic vs epoxy floor coating: the measurable differences
The two chemistries behave differently enough that “which is better” is the wrong question. The right question is which properties matter most for your floor.
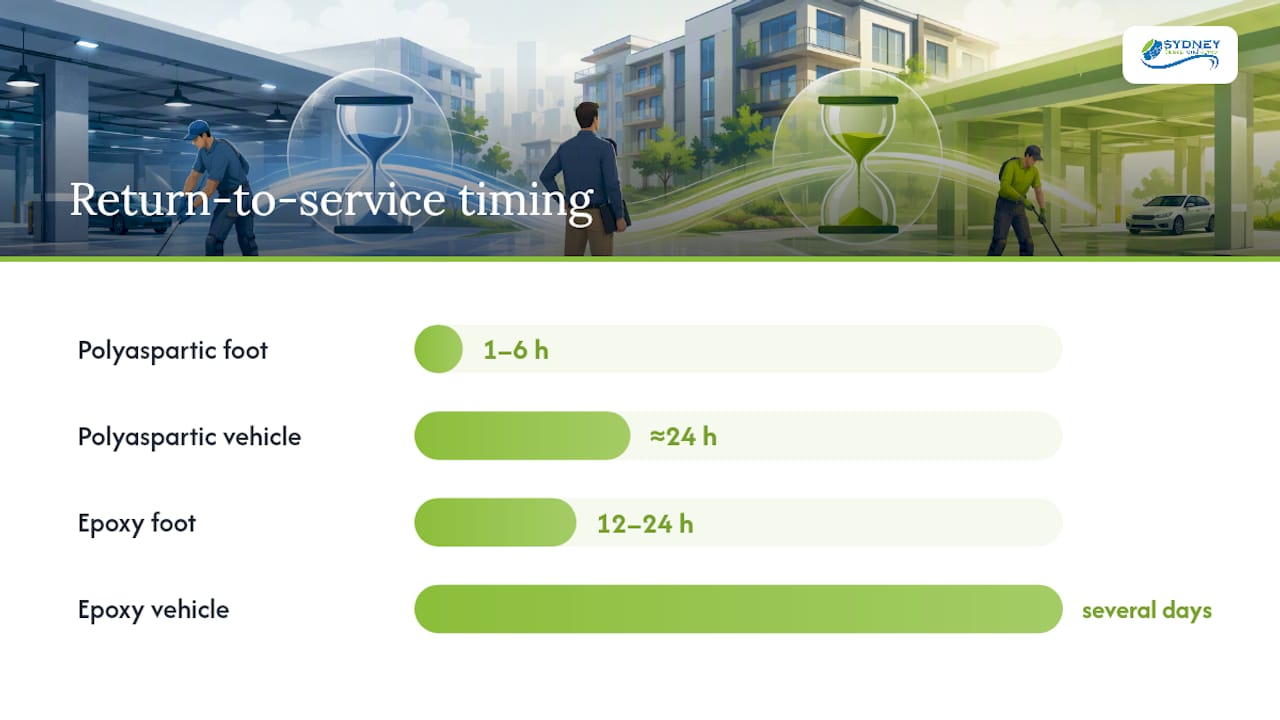
Cure and return to service is where polyaspartic pulls ahead by a wide margin. Many polyaspartic systems allow foot traffic within 1 to 6 hours and vehicle traffic within roughly 24 hours, while epoxy typically needs 12 to 24 hours before you can walk on it and several days before it reaches full cure. For a warehouse that can’t afford a weekend shutdown, that gap decides the job before you even look at price.
UV stability favours polyaspartic just as clearly. Standard epoxies are prone to ambering when sunlight hits them, a slow yellowing that shows up around roller doors, skylights and exterior bays. Polyaspartic resins are aliphatic, which makes them far more resistant to that yellowing. If the floor sits anywhere near a window or an open bay door, this alone can settle the argument.
Hardness, abrasion and chemical resistance are closer calls, and here the caveats matter more than the chemistry. Both systems can be formulated for heavy-duty performance, and product quality varies more within each category than between them. A premium epoxy with the right filler package can outlast a cheap polyaspartic, and vice versa. Don’t take either label as a guarantee of toughness.
- Cure speed: Polyaspartic wins comfortably; epoxy needs planned downtime.
- UV resistance: Polyaspartic resists yellowing; standard epoxy does not.
- Hardness/chemical resistance: Roughly comparable, product-dependent.
- Pot life: Epoxy gives you more working time; polyaspartic gives you almost none.
- Material cost: Epoxy is usually cheaper per litre; polyaspartic often costs more but saves on labour and downtime.
Pot life is the detail most homeowners underestimate. Some polyaspartic formulations set up in as little as 15 to 25 minutes, which is why experienced applicators treat it more like an automotive refinish than a standard floor coating. Get the mixing, spreading or backrolling timing wrong and you’re left with lap marks, uneven texture or a batch that starts curing in the tray.
Pro Tip: Ask any contractor quoting a polyaspartic job how many people will be on the tools during application. A crew of one trying to cover a two-car garage before the pot life runs out is a red flag, not a cost saving.
How epoxy and polyaspartic are actually applied
Surface prep decides more about the outcome than the coating you pick. Both systems demand mechanical grinding or shot blasting to profile the concrete, followed by moisture testing, because poor adhesion is consistently traced back to contaminated or unprofiled slabs rather than the chemistry itself.
- Clean and degrease the slab, removing oil, efflorescence and old sealer residue.
- Grind or shot blast to open the concrete’s pores so the coating can bite in.
- Test moisture and vapour transmission, since a slab that’s still “wet” underneath will blister almost any coating eventually.
- Apply the epoxy base or primer, broadcasting decorative flakes or aggregate if the spec calls for it.
- Roll or spray the polyaspartic topcoat within its working window, watching temperature and humidity closely.
Epoxy’s higher moisture tolerance is one reason it’s often chosen as the base layer on imperfect slabs, particularly in older buildings or coastal properties where damp is a recurring issue. Polyaspartic, by contrast, has a narrower application window: it’s fussier about ambient temperature and humidity, and its short pot life leaves little room for a slow crew or a hot afternoon.
Pro Tip: Before booking anyone, ask three questions: what moisture reading triggers a “no go” on this slab, how many coats and squeegee passes does the pot life allow, and what’s the recoat window if a section needs a touch up.
What does it cost, and how long does it last?
Material and labour costs run in opposite directions to performance. Epoxy is generally cheaper per litre and forgiving of thicker film builds, which is why broadcast systems with decorative chips or heavy aggregate almost always start with an epoxy base. Polyaspartic costs more upfront but claws that back through faster turnaround, since less downtime often outweighs a higher material bill for retail floors, occupied offices or any building that can’t close for a week.
- Installed cost drivers: grinding and prep, broadcast media, number of coats, and topcoat choice all add to the quote.
- Lifespan drivers: moisture exposure, traffic volume and chemical spills shorten service life faster than UV exposure alone.
- Faster cure pays off most clearly where every day of closure has a dollar figure attached.
This is exactly where hybrid builds earn their reputation. A floor that sees forklift traffic, occasional chemical spills and direct sun through a loading dock benefits from epoxy’s build underneath and polyaspartic’s surface toughness on top, stretching the useful life of the whole system rather than compromising on either layer.
Maintenance, recoating and everyday cleaning
Both coatings are low-maintenance compared with bare or sealed concrete, but they’re not maintenance-free, and skipping routine cleaning is the fastest way to shorten either system’s life.
- Sweep or dust-mop daily in high-traffic areas to stop grit from scratching the surface.
- Damp-mop weekly with a pH-neutral cleaner, avoiding harsh solvents that can dull the topcoat.
- Recoat epoxy by light-scuffing and rolling a fresh layer, generally straightforward since epoxy bonds well to itself.
- Recoat polyaspartic carefully, as some formulations bond less readily to an aged, fully-cured surface without proper abrasion first.
- Add slip-resistant additives to the final coat in wet-prone areas, entries and ramps, and check them annually.
Our guide to epoxy floor cleaning routines covers the specific agents and schedules that keep an epoxy surface glossy without stripping its resistance.
When to choose polyaspartic, epoxy, or both
Cut through the marketing and the decision usually comes down to three questions: what’s the slab condition, how much UV hits the floor, and how much downtime can you afford?
- Choose polyaspartic for garages, showrooms and any UV-exposed surface where you need it back in service the same day.
- Choose epoxy for warehouses, industrial floors and cost-sensitive jobs where the slab isn’t perfect and thick broadcast systems matter more than gloss retention.
- Choose the hybrid (epoxy base, optional broadcast, polyaspartic topcoat) for almost any mixed-exposure floor, since it’s the combination installers reach for most often when a floor needs both adhesion and surface durability.
Before you commit to either system, run through this checklist with your contractor:
- Has a moisture test actually been done, or is the quote based on a visual inspection alone?
- What’s the pot life plan if the crew is short-staffed on the day?
- What recoat window applies if a repair is needed in year three, not year one?
- Is the “epoxy” or “polyaspartic” quoted a commercial-grade product, or a lower-cost retail formulation?
A residential garage with good drainage and full sun through the door usually points to the hybrid build. A dim warehouse bay with a known damp patch points to epoxy first, with polyaspartic reserved for zones that see direct light. A retail showroom that can’t close for more than a weekend points straight to polyaspartic, moisture permitting.
What Sweepandscrub sees before a coating goes down
As a mechanical cleaning and pressure-washing operator working across warehouses, car parks and public spaces, operators see first-hand how many coating failures start with a slab that was never properly prepared, not a bad choice between polyaspartic and epoxy.
Before any coating job, the checklist looks like this:
- Mechanical sweep to clear loose grit and debris before wet cleaning begins.
- Degrease and hot-water wash to strip oil, grease and old sealer residue.
- Efflorescence removal where salt deposits are visible on the surface.
- Moisture spot-checks flagged for the coating contractor before they quote the job.
Scheduled mechanical cleaning between coating cycles also matters more than most property managers expect. Grit left to grind underfoot acts like sandpaper on both epoxy and polyaspartic, so regular mechanical cleaning extends the coating’s working life regardless of which chemistry sits on top.
If you’re weighing up a coating job and want the slab properly assessed and cleaned first, Sweepandscrub’s hard surface cleaning service handles the mechanical prep, degreasing and efflorescence removal that coating contractors rely on before they’ll warranty their work. Booking that step separately, before you get quotes on the coating itself, often saves you from paying for prep twice.
Sources
- Notes from the field: polyaspartic vs epoxy (Chris Mellin, Coatings Pro 2026)
- Epoxy vs Polyaspartic Floor Coatings — Which to Choose | Canopus Supply
- Polyaspartic vs Epoxy: Melbourne Garage Flooring 2026 – Newline Painting
- Polyaspartic Coating vs. Epoxy: Which is Right for You? – IPP Magazine