
The quickest safe fix is an oxygen-based or purpose-labelled outdoor mould cleaner: apply it, let it dwell, scrub with a stiff brush, then rinse thoroughly and let the surface dry fully before sealing. Wear gloves and eye protection, keep runoff off garden beds and out of drains, and if you’re dealing with more than a small patch, recurring growth, or a damp slab that won’t dry out, call a professional instead of chasing the problem yourself.
TL;DR:
- For embedded black mould, oxygen-based cleaners are safer, penetrate better, and are gentler on plants compared to bleach, which is more surface-focused.
- Proper drainage, vegetation management, and applying penetrating sealers are essential to prevent mould regrowth on outdoor concrete.
- DIY mould removal is practical only on small areas up to 10 square meters; larger or persistent patches should be handled by professionals with industrial-grade equipment.
- Natural alternatives like vinegar and baking soda work for light patches but need frequent reapplication and don’t replace ongoing moisture control measures.
Table of Contents
- How to remove mould from concrete outdoor surfaces step by step
- What tools and materials do you actually need?
- Which mould cleaner should you actually use?
- Pressure washer or soft wash: which one wins?
- How do you stop mould coming back?
- When should you skip the DIY approach entirely?
- When is it time to call in the professionals?
- Is it mould, algae, or just dirt?
- Why does mould keep growing on outdoor concrete?
- Does mould actually damage the concrete, and is it a health risk?
- Are there natural alternatives to chemical cleaners?
- How do you know if the mould is really gone for good?
- Get the professionals in for the jobs DIY can’t handle
- Sources
How to remove mould from concrete outdoor surfaces step by step
Getting rid of mould on a patio or driveway isn’t complicated, but the order you do things in matters. Skip a step and you’ll be back out here in six weeks doing it again.
-
Clear the area and protect what’s nearby. Sweep off loose leaves, dirt and grit first, mould loves organic debris and a clean surface lets the cleaner actually reach the growth. Wet down any nearby garden beds with plain water so chemical runoff doesn’t scorch plants, and cover garden furniture or timber decking with a tarp.
-
Test a small patch. Dab your chosen cleaner on an inconspicuous corner and wait 10 minutes. Coloured, stamped or exposed-aggregate concrete can react differently to chemicals than a plain grey slab, so this five-minute check saves you from bleaching a visible blotch into your driveway.
-
Pick your cleaner based on severity. A light green film on a shaded path might only need diluted vinegar. Thick black mould embedded in old, porous concrete usually needs an oxygen-based cleaner or a product labelled specifically for outdoor mould and mildew. Mix strictly to the label, concentration matters more than most people assume.
-
Apply and let it dwell. Pour or spray the solution evenly across the affected area. Most oxygen-based cleaners need 10 to 20 minutes of dwell time to break down the biofilm sitting in the concrete’s pores, don’t rush this part by scrubbing immediately.
-
Scrub with a stiff-bristle brush. Work in overlapping strokes, applying steady pressure into any pitting or texture where spores hide. A deck brush on a long handle saves your back on larger areas like driveways.
-
Rinse completely. Hose down the whole surface, not just the treated patch, to flush out both the cleaner and any dislodged spores. Repeat the process on stubborn patches rather than increasing chemical strength.
-
Dry and inspect before sealing. Concrete needs to be completely dry, not just surface-dry, before you apply any sealer. Check back after 24 to 48 hours of good weather; a sealer applied over damp concrete traps moisture instead of blocking it.
Textured patios and exposed-aggregate driveways need a gentler touch than a plain garage floor. Extra dwell time and more scrubbing beats extra pressure every time on these surfaces, since pressure washing guides warn that high pressure can etch or strip the fine aggregate finish that gives these surfaces their grip and look.
What tools and materials do you actually need?
Half the frustration with DIY mould removal comes from using the wrong brush or the wrong cleaner strength for the job. Here’s what earns a spot in the shed:
- A stiff-bristle deck brush or scrubbing broom for general patios and driveways; a smaller handheld brush for tight corners and steps.
- A pressure washer rated for domestic use, paired with a wide fan or turbo nozzle rather than a pencil-point tip that concentrates pressure into one damaging spot.
- An oxygen-based outdoor cleaner or a labelled concrete mould remover as your primary product, with white vinegar on hand for small, light patches.
- Rubber gloves, safety glasses and a P2 mask, plus a tarp to catch runoff and a watering can to dilute any overspray near garden beds.
- A garden hose with a spray nozzle for the final rinse.
Most of this is available at any hardware store or Bunnings, and a decent pressure washer for occasional home use doesn’t need to be expensive. Before you start, check your hose fittings and washer seals aren’t perished, a split fitting under pressure is a wet, annoying surprise nobody needs.
Which mould cleaner should you actually use?
Not every cleaner suits every job, and the wrong choice can do more damage than the mould itself.
Bleach kills mould sitting on the surface fast and cheap, but it has real limits. It’s corrosive to skin and eyes, it can strip or discolour existing sealers, and it often can’t penetrate deep into porous, older concrete where mould roots itself. Runoff also harms lawns and garden beds fast.
Oxygen-based cleaners and hydrogen peroxide are the safer middle ground. They’re gentler on plants, don’t bleach coloured concrete, and penetrate the concrete’s pores better than bleach on rough or aged surfaces, which is exactly where mould likes to hide.
Vinegar and baking soda handle small, light patches well but struggle against thick, established growth. Treat them as a maintenance tool, not a heavy-duty fix.
- Bleach: fast on surface stains, corrosive, poor penetration, plant-unsafe.
- Oxygen-based cleaners: gentler, better penetration, safer for gardens and colour.
- Vinegar/baking soda: fine for light patches, underpowered for heavy growth.
Pro Tip: Always read the label’s dilution ratio twice before mixing anything. Oxygen-based cleaners work best at the manufacturer’s stated concentration, going stronger doesn’t speed things up, it just increases the chance of surface damage or runoff harm.
Pressure washer or soft wash: which one wins?
For most driveways and patios, a pressure washer set between 2,000 and 3,000 PSI with a wide fan nozzle handles mould removal safely. Going higher than that on textured or exposed-aggregate concrete risks stripping the finish, since trade guidance confirms high pressure etches soft aggregate surfaces.
- Hold the nozzle 20 to 30 centimetres from the surface and keep it moving in overlapping passes, never lingering on one spot.
- Use a 25 or 40 degree nozzle for general cleaning, save narrow tips for isolated stains.
- For heavily textured or older, crumbling concrete, soft washing (a chemical cleaner with a longer dwell time and low-pressure rinse) protects the surface better than raw pressure.
- Reserve genuine high-pressure work, hot-water units or industrial nozzles for professionals, particularly on large commercial aprons or ageing slabs.
How do you stop mould coming back?
Cleaning mould off concrete is maintenance, not a cure. Skip the moisture fix and you’ll be scrubbing the same patch again by next season, a point WorkSafe Queensland makes clear in its guidance on managing mould at the source.
Start with drainage. Check that paths and patios slope away from garden beds rather than pooling water, clear gutters that dump straight onto concrete, and trim back overhanging shrubs or trees that keep a shaded strip permanently damp.
Sealing matters just as much. Penetrating silane or siloxane sealers soak into the concrete and repel water while still letting vapour escape, which suits most outdoor surfaces better than a film-forming acrylic that can trap moisture underneath if applied to a damp slab. Penetrating sealers typically need reapplication every few years depending on foot traffic and sun exposure.
- Fix drainage and trim vegetation before you seal anything.
- Choose a penetrating sealer for shaded, damp-prone areas; only seal fully dry concrete.
- Sweep monthly, inspect shaded corners each season, and spot-clean early growth before it spreads.
When should you skip the DIY approach entirely?
Not every job belongs to a weekend with a hose and a scrub brush. Certain conditions push mould removal from a DIY task into a health and safety issue.
- Full PPE, gloves, eye protection and a mask, isn’t optional; mould exposure is recognised as a biological hazard requiring proper controls even outdoors.
- Anyone in the household with asthma, allergies or a respiratory condition should stay away from the area during cleaning and drying.
- If the mould covers a large slab or keeps returning within weeks, an ongoing moisture source is likely the real problem, not a cleaning gap.
- Always direct runoff away from stormwater drains and garden beds to avoid breaching local water-use rules.
Remediation guidance commonly treats roughly 10 square metres as the practical ceiling for confident DIY mould removal, beyond that, professional-grade equipment and containment do the job faster and more safely.
When is it time to call in the professionals?
A small, isolated patch on a garden path is a Saturday job. A driveway with black streaks across half its surface, a strata car park apron, or a commercial forecourt is a different scale of problem entirely.
Professional cleaning brings hot-water pressure washing, which lifts ingrained biofilm that domestic cold-water units simply can’t touch, along with containment to manage runoff and, where needed, sealer application straight after cleaning. Sydney Sweep and Scrub runs eco-friendly, carbon-neutral operations with industrial-grade gear built for exactly this kind of large or recurring job.
- If the affected area is larger than a small patio or the growth keeps returning, get a quote rather than repeat the DIY cycle.
- Ask any provider about water temperature, runoff management, and whether sealing is included after cleaning.
- Expect a proper quote to specify equipment used, treatment method and any warranty on the finish.
- Commercial and strata surfaces almost always suit mechanised cleaning over hand tools, purely on time and consistency grounds.
Is it mould, algae, or just dirt?
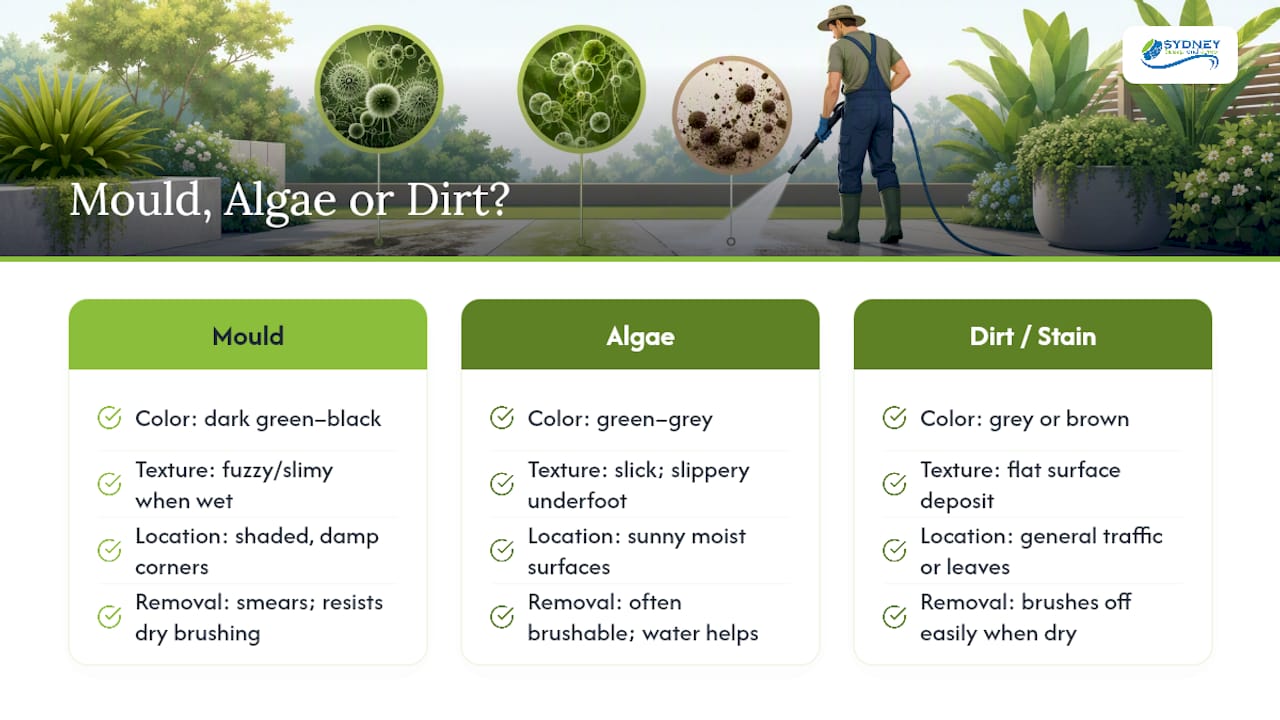
Not every dark patch on your concrete is mould, and treating the wrong problem wastes both time and cleaner.
Black mould typically appears as dark green to black speckled or blotchy patches, often in shaded, consistently damp corners like under eaves or beside fences. It has a slightly fuzzy or slimy texture when wet and tends to smear rather than brush off dry.
Algae, by contrast, usually shows up as a green or grey slick, often slippery underfoot, and thrives on surfaces that get regular light along with moisture, think pool surrounds and open driveways after rain. It responds well to the same cleaning approach as mould but can sometimes be managed with plain water and a stiff brush alone.
Plain dirt and organic staining sit flat on the surface, brush away relatively easily when dry, and don’t return within days the way active mould growth does.
A simple test: dab a small amount of diluted bleach or oxygen cleaner on the patch. If it lightens noticeably within a few minutes, you’re likely dealing with mould or algae. If the stain barely shifts, you may be looking at rust, tannin staining from leaves, or an oil residue, none of which respond to mould treatments and need a different cleaner entirely. Persistent grey or brown discolouration that doesn’t respond to any cleaner is often mineral efflorescence from within the concrete itself, a cosmetic issue rather than a biological one.
Why does mould keep growing on outdoor concrete?
Mould needs three things to establish itself on concrete: moisture, organic food, and shade. Outdoor slabs tick all three boxes more often than homeowners realise.
Shaded, south-facing patios and paths that sit under trees or beside fences stay damp for hours after rain or dew, sometimes days in cooler months. Add fallen leaves, grass clippings or pollen settling into the concrete’s texture, and you’ve supplied the food source mould spores need to colonise.
Poor drainage compounds the problem. A slab that slopes toward the house or pools water near a garden bed will stay wet long after the rest of the yard has dried, creating a permanent damp zone. Older, more porous concrete holds moisture in its pores longer than a newer, denser pour, which is part of why ageing driveways often show heavier growth than a recently laid slab nearby.
Humidity and rainfall frequency matter too, coastal and subtropical areas see mould establish faster and return sooner after cleaning than drier inland regions. That’s less about the concrete itself and more about how long the surface stays wet between weather events.
Does mould actually damage the concrete, and is it a health risk?
Mould doesn’t eat concrete the way rust eats metal. It feeds on the organic debris and biofilm sitting in the surface pores, not the concrete itself, which is why cleaning and denying moisture is the durable fix rather than any structural repair.
That said, mould isn’t harmless to have around. Left untreated for years, persistent dampness that feeds mould growth can contribute to surface degradation, freeze-thaw cracking in cooler climates, and accelerated wear on any existing sealer. The mould is more a symptom of ongoing moisture problems than a direct cause of structural damage, but ignoring both together speeds up general wear.
Health-wise, mould exposure is classed as a biological hazard, and prolonged contact or inhalation of spores can trigger respiratory irritation, allergic reactions, or worsen asthma symptoms in sensitive individuals. Outdoor exposure is generally lower risk than indoor mould because of ventilation, but disturbing a large, dry, spore-heavy patch during cleaning, especially with a pressure washer creating mist, can send spores airborne. That’s the practical reason PPE isn’t optional, even for a job done entirely outside.
Are there natural alternatives to chemical cleaners?
Plenty of homeowners want mould gone without reaching for anything harsh, and for lighter jobs, that’s entirely doable.
White vinegar, diluted roughly one part vinegar to one part water, breaks down light mould and algae film on regularly used paths and steps. It won’t match an oxygen-based cleaner on stubborn, embedded growth, but it’s cheap, safe around pets and plants, and handles routine upkeep well.
Baking soda paste works similarly for small, isolated spots, scrub it in, let it sit for 15 minutes, then rinse. Combining the two (vinegar first, baking soda scrub second) gives a mild mechanical boost without any harsh chemical involved.
For gardeners wary of runoff altogether, plain hot water and a stiff brush can shift a surprising amount of light surface growth on its own, particularly when caught early. The trade-off is elbow grease; natural options generally need more scrubbing time than a dedicated cleaner to achieve the same result.
None of these natural options include a sealing step, so pair any eco-friendly clean with the drainage and vegetation fixes covered earlier if you want the result to last.
How do you know if the mould is really gone for good?
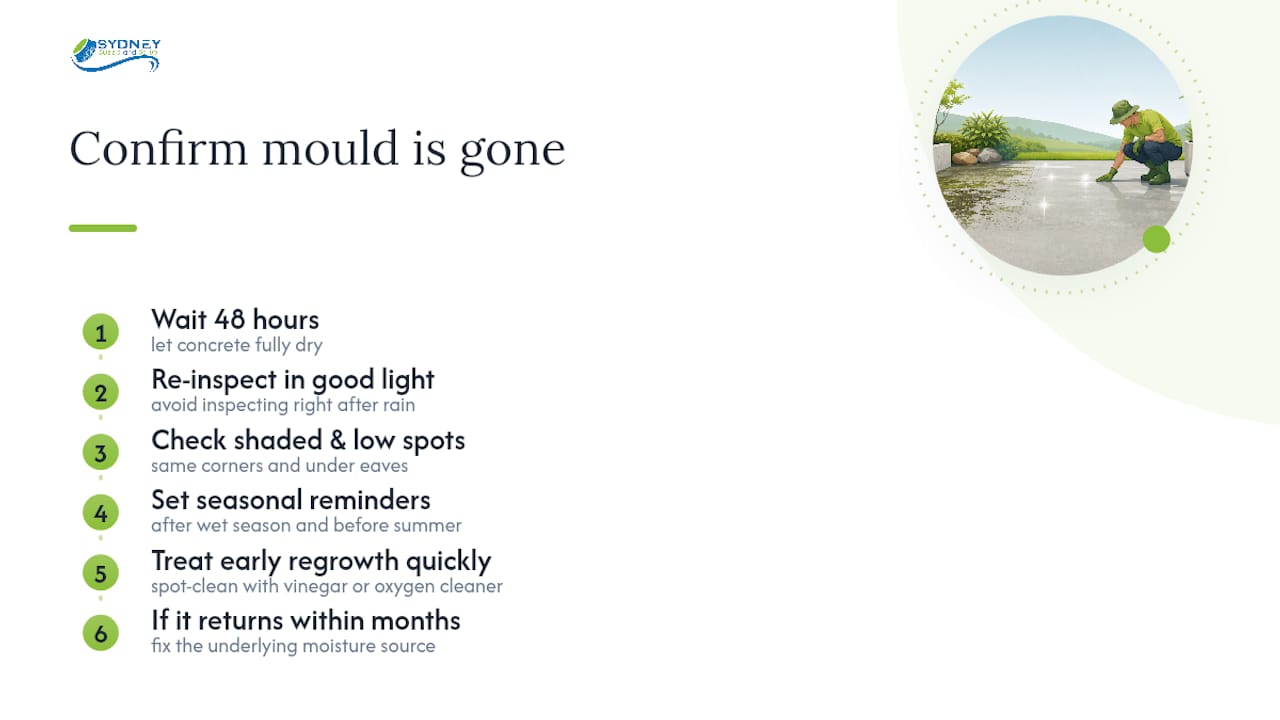
Finishing the rinse isn’t the end of the job. It’s the start of the monitoring phase. Mould that looks gone on a wet surface can sometimes resurface faintly once the concrete dries fully, so give it 48 hours before declaring victory.
Walk the treated area again after that drying window in good light, ideally not right after rain when everything looks uniformly damp. Check the same shaded corners and low-lying spots that grew mould originally, since these microclimates are the first place regrowth shows if the underlying moisture issue wasn’t addressed.
Set a simple seasonal reminder, once after each wet season and once before summer, to inspect shaded paths, under eaves, and anywhere garden beds sit close to concrete. Early regrowth is usually a faint grey or green tinge rather than the dark blotching you started with, and it responds to a quick spot clean with vinegar or your oxygen-based cleaner rather than a full repeat of the entire process.
If the same patch keeps reappearing within a few months despite cleaning and sealing, that’s your signal the moisture source, not the mould, still needs fixing. A conservative approach to textured surfaces during any repeat clean also protects the finish from cumulative wear across multiple treatments.
Get the professionals in for the jobs DIY can’t handle
Large driveways, strata common areas and commercial aprons are a different job to a garden path, and that’s exactly where Sweepandscrub earns its keep. Instead of hiring a domestic pressure washer and burning a weekend on a slab that’s really too big for hand tools, you get industrial-grade, hot-water pressure washing that lifts ingrained mould and biofilm in a fraction of the time, backed by carbon-neutral operations if sustainability credentials matter for your strata reporting or council contract.
The booking process is straightforward: request a quote online, describe the surface and area, and get a scoped price without the back-and-forth. For anything beyond a small patch, whether that’s a shared driveway, a car park apron or a public walkway, explore hard surface cleaning and get a quote before mould has a chance to spread further.
Sources
- Managing mould — WorkSafe Queensland
- Mold on concrete: Causes, removal & prevention — RestoreAdvisor
- How to clean a concrete driveway in the tropics — Bunnings
- How to kill black mould on your concrete driveway — Concept Concrete